Week 4: MARKING OUT ON WOOD
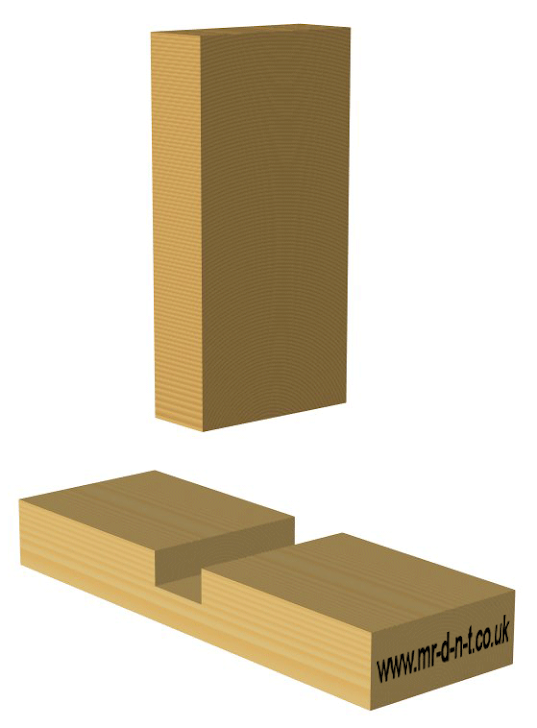
Topic: Making a Housing Joint
Sub-topic: Marking Out on wood
Modality: Face to Face
Level: Form 5
Duration: 3 hrs
No. of students: 25
Aim of the lesson:
The aim of this topic is to provide students knowledge and understanding about common hand tools for measurement and marking out.
Learning Objectives:
To identify marking tools for joinery and understand how to use them correctly.To understand the importance of hand processes.
To identify and use common hand tools for measurement and marking out.
To be familiar with the basic techniques involving some common hand processes.
Assessment criteria:
Ø Activity 10 (Hot potatoes-multiple choice) carries 5 marks
Ø Activity 11 (Hot potatoes- Matching) carries 5 marks
Ø Activity 12 carries 10 marks
Total marks: 20
Presenting the Lesson
· Clip to introduce the lesson
· Tools used for marking out on wood
· Uses and photo of each tool
· Steps for Marking out
· Activities
Clip on Marking out process to introduce the lesson (from Youtube)
Tools used for marking out on wood
It is commonly believed that Housing joint is difficult to lay out, but there's actually an underlying simplicity to it. Furthermore, you need only five marking tools and they, too, are relatively simple: a pencil, a marking knife and three gauges - marking, cutting and mortise. You also need two measuring tools - try square and sliding bevel - to guide your pencil and marking knife. This lesson introduces these tools and explain how to use them.
Pencil
The most universal marking tool is the pencil. The pencil makes two specific types of lines: orientation marks and cutting guidelines. Face side and face edge marks are orientation marks, which I discussed in a previous lesson (see Chapter 4, Lesson 1: Face Side, Face Edge and Width). Use a sharp B pencil to mark cutting guidelines on mortise and tenon or dovetail joints.

Marking Knife
The marking knife is essential for the exacting job of marking the shoulder lines of tenons and marking the dovetail pins from the tails. Because the marking knife cuts the outside fibers that form the visible part of the shoulder line, it determines the final fit and appearance of the joint. What's more, it does so at the marking out stage, not the joint cutting stage.
The blade of a marking knife should be thin in section and sharpened to a slim V. In side elevation the end of the knife should be rounded rather than pointed. A pointed knife is liable to produce a ragged cut because of the pressure concentrated at the point. A rounded edge, with pressure distributed over a curved edge, will produce a smooth cut. A Swiss Army knife works perfectly.
The blade of a marking knife should be thin in section and sharpened to a slim V. In side elevation the end of the knife should be rounded rather than pointed. A pointed knife is liable to produce a ragged cut because of the pressure concentrated at the point. A rounded edge, with pressure distributed over a curved edge, will produce a smooth cut. A Swiss Army knife works perfectly.

Marking Gauge
The marking gauge has a steel spur sharpened like the point of a pencil. The spur incises a line by parting the fibers of the wood. It's a perfect shape for working with the grain but totally unsuitable for working across the grain because it tears the fibers.
The spur is made of steel that's too hard to sharpen or reshape with a file, so you have to use a small sharpening stone. The spur should stick out 3/16" from the stock. To adjust the spur, clamp the blunt end of the spur in a machinist's vise and tap the gauge up or down.
The spur is made of steel that's too hard to sharpen or reshape with a file, so you have to use a small sharpening stone. The spur should stick out 3/16" from the stock. To adjust the spur, clamp the blunt end of the spur in a machinist's vise and tap the gauge up or down.

Cutting Gauge
The cutting gauge has a small steel knife, which is held in its mortise by a wedge of cast brass. The knife incises a line by cutting across the fibers of the wood. Don't use the cutting gauge to cut with the grain. The mark is difficult to see and difficult to keep straight because it tends to wander with the grain direction.
The knife usually comes from the manufacturer with a sharp point, but it works better rounded. Grind and sharpen it like any other cutting edge. There's a flat side and a bevel side - just like a chisel. The bevel always faces the waste side of the line. Remove the wedge to change the orientation of the knife. Tighten the wedge when you replace it by tapping with a hammer.
The knife must be parallel to the face of the fence. If necessary, re-align the square hole with a narrow chisel so that knife and wedge seat snugly and accurately. If the wedge is a rough casting, file it smooth for a better fit. If the wedge gets lost, make a new one out of hardwood.

Mortise Gauge
The mortise gauge has a fixed top spur and a moving bottom spur. If the moving mechanism is binding, disassemble the gauge and clean the parts. That usually solves the problem.
When you disassemble the mortise gauge, look out for a little metal disc that sits under the stock's locking screw. It keeps the screw from damaging the brass strip. If you lose the disc, you must replace it.
Some mortise gauges have a third spur on the back side of the stock. The idea is that by using this spur like a regular marking gauge, you get two tools for the price of one. The economy is false because regular marking just wears out the fence of the expensive mortise gauge sooner than necessary. What's worse, you will likely one day puncture your thumb on one of the spurs.

Steps for Marking out on wood
Step 1:
MEASURING
30 centimetre steel rules are used for marking- off measurements on wood. They are not normally used to draw straight lines with as you would on paper.
MEASURING
30 centimetre steel rules are used for marking- off measurements on wood. They are not normally used to draw straight lines with as you would on paper.
Step 2:
DRAWING LINES ON WOOD
Pencils are used for marking out lines across, on and around wood.They need to be kept sharp to provide thin and accurate lines. HB or H pencils are best and you are expected to have your own pencil with you for all lessons.
Please note; all the sizes and measurements used In the CDT Dept. are in millimetres (mm) NOT centimetres! (or inches!!)
Remember, 10 mm =1 cm and 1000 mm = 1 metre
step 3:
HOW TO GET AN ACCURATE DEPTH
Marking out the line A-A for a Housing Joint requires a Marking gauge.
It will cut a line into the wood that will be parallel to the edge E-E. The thumb- screw fixes the stock In position.
Step 4:
LINES DRAWN AT 90 Degrees TO AN EDGE
The only. toot that will guarantee that line B-B is drawn at a right-angle (90 degrees) across a piece of wood is a Try square. They are also used to check that a piece of wood is accurate and square at the ends.
Step 5:The only. toot that will guarantee that line B-B is drawn at a right-angle (90 degrees) across a piece of wood is a Try square. They are also used to check that a piece of wood is accurate and square at the ends.
ACCURATE CUTS IN WOOD
(how to get started (in an exact position). If a saw cut or chiselling is to be made across the grain of wood, a marking knife can be used to “go-over” lines drawn in pencil. It will cut the surface fibre and give an accurate and clean start for saws to begin on.
(how to get started (in an exact position). If a saw cut or chiselling is to be made across the grain of wood, a marking knife can be used to “go-over” lines drawn in pencil. It will cut the surface fibre and give an accurate and clean start for saws to begin on.
You may need to mark-out and check lines at an angle of 5 degrees on your biscuit cutter shape. The only marking out tool that will allow you to do this is a Sliding bevel, shown in the drawing below. It can be adjusted to provide any angle between the wooden stock and the steel blade.
Activity 10: Multiple choice (Hot potatoes)
Activity 11: Matching (Hot potatoes)
Activity 12: make freehand sketching and give the uses of 3 of the tools used for marking out on wood. Please send your worksheet to my mail for correction.
You are so hardworking.
ReplyDelete