Week 5: MAKING A HOUSING JOINT
Topic: Making a Housing Joint
Sub-topic: Making Housing Joint
Modality : Online
Level : Form 5
Duration:
No. of students: 25
Aim of the lesson:
The aim of this topic is to help students master the technique of making a Housing Joint
Learning Objectives:
At the end of the lesson, students should be able to:
Ø Identify the different types of wood joints
Ø Differentiate between housing joint and other existing wood joints
Ø List the different types of housing joint
Ø Mention the applications of housing joint
Ø List the different steps for making housing joint
Assessment criteria:
Ø Activity 13 carries 10 marks
Ø Activity 14 carries 10 marks
Total marks: 20
Presenting the Lesson
· Different types of wood joints
· What is a housing joint
· Different types of housing joint
· Advantages of housing joint
· What are the applications for this type of joint?
· Video clip on housing joint
· Steps of making housing joint
Different types of wood joints
There are many wood joints available to make, joints are used to build strength into products. The joints below are the joints that are commonly used in schools. Note only glue is used to join these joints together.
1. Butt joint A very simple joint but it is also very weak. They tend to be used for making picture frames, corner pieces and nails are often used to strengthen the joint. | |
 |
2. Mitre joint Mitre joints are often used to produce the corners of picture frames and boxes. The mitre needs to be cut at a 45 degree angle, this is often used with a mitre saw that can cut at many different angles. | |
 |
3. Halving joint There are many versions of the halving joint but they all involve removing half of the wood from each piece using a saw or a chisel. This joint is often strengthened with dowel. | |
 |
4. Mortise and Tenon This is a very strong joint. The joint is split into two parts one part is the tenon named after the tenon saw, the other part is the mortise which is named after the mortise chisel. Within industry the joint is milled using a milling machine. | |
 |
5. Dowel joint This joint is quite easy to make, it consists of drilling accurate holes in both sections of wood and joining them with dowel pegs. Within in industry this is often used to construct flat pack furniture. | |
 |
6. Lap joint This joint is only slightly stronger than the butt joint. There is however a bigger surface area for gluing. This joint is often strengthened with nails. | |
 |
7.Housing joints This is just a simple slot cut into one piece of wood to increase the glue area. This is often done with a router and works very well in MDF. | |
 |
8.Finger joint This is the strongest joint on this page, the only joint that is stronger is the dovetail joint. The finger joint can be difficult to make but looks very good. It has a lot of surface area to glue together. | |
 |
Joining timber using components
In industry wood joints are being substituted for new quicker and cheaper methods of fixing wood together. The commercial move towards flat pack furniture has encouraged the use of these components. Nails Nails are used to improve very weak joints but they can rust within the timber. Nails on wood joints are often used with glue to improve the joints strength. Nails are often used for quick fix’s such as fixing backs of cupboards and general building and DIY work. Nails and pins are usually made of mild steel and come in many types e.g. – panel pins, veneer pins, oval nails and round nails. Putting nails in at an angle or dovetailing the nails makes a stronger joint. Nails are useful for fixing woods to woods.  The nails above are put in on an angle (dovetailing) to make the joint stronger. Screws Screws are often used with glue to improve joints strength. A screw is at its strongest when used across the grain. There are many types of screws but the most popular are the cross-head screws as they are easier to fix in by hand or using an electric screwdriver. Screws can come with flat heads or cross heads. Flat headed screws if counter sunk will run flush with the wood. This means that the screw will be neat and not obvious to see. Screws are useful for fixing woods to woods or metal or plastic to woods.
Knock down fittings Knock down (KD) fittings are mainly used within flat pack furniture or for assembly by the user. They are used within kitchen units or self-assembly furniture. Knock down (KD) fittings are often plastic fittings which can be joined together with one screw or bolt. A simple knock down fitting is a 'block joint'. Block joints are simply plastic blocks that take screws in different directions. 
| ||||||

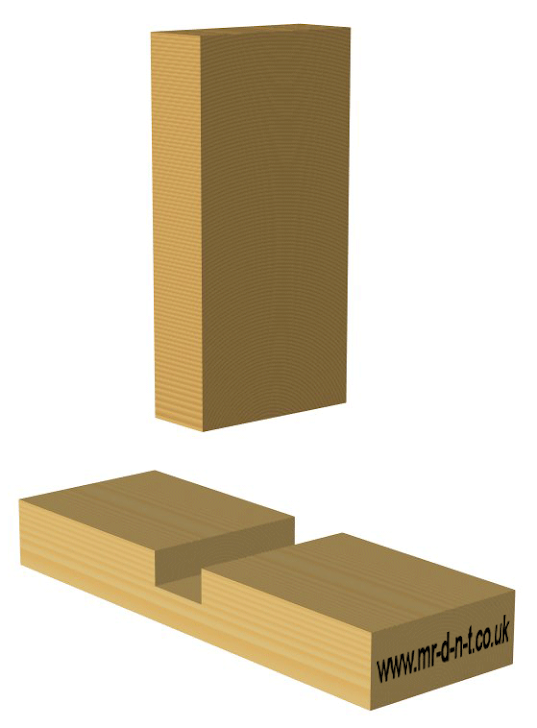
What is a housing joint?
Housing joints are used when two pieces meet at right angles on their narrow face. A shallow trench is cut across the grain of the vertical member, the shelf or panel is then glued into a simple straightforward housing and all the loads are transferred to the sides of the unit. Pins can further strengthen the joint.
Different types of housing joint
The trench of the though housing goes fully across the piece of wood so the joint can be seen. | |
Stopped housing joint For decorative effect, the trench of the housing is often stopped short of the front edge of the side panel by some 9 - 12 mm. No part of the joint is visible from the front because the joint is completely concealed. This is particularly important where a high quality finish is required. |
Tapered housing joint A tapered housing joint is used for deep cabinets. Extra strength is created by the dovetail slope on one side giving it more holding power then the through housing. It has good resistance to tension. | |
Tapered stopped housing joint This joint is a version of the tapered housing joint. The tapered housing can be stopped 9 - 12 mm from the front to conceal the joint. Similar to the stopped housing joint no part of the joint is visible from the front because the joint is completely concealed. This is particularly important where a high quality finish is required. |
Advantages of housing joint
· Simple to make.
· Strong.
· In its basic form only one component has to be shaped.
What are the applications for this type of joint?
Used for fixing shelves to vertical panels in deep cabinets, bookcases, storage units and boxes, or for drawer fronts and carcase/frame construction.
Video clip on housing joint
Steps of making housing joint
a) The housing joint is a useful structural joint, particularly in cabinets and shelving units. It is sometimes also called a dado joint, and is effectively a trench that is cut across the grain of the timber, into which the end of another component is inserted. The difference between a groove and a housing is that a groove always runs along the grain, whereas a housing runs across it.
b) A well-made housing is a strong and reliable joint that is simple to make. There are several variations that have evolved to suit different situations. The simplest is the through housing, where the joint runs the full width of the work piece, and is clearly visible at both ends. A more refined version is the stopped housing, where the front edge of the joint is concealed, resulting in a neater appearance. Where maximum strength is needed, the dovetail housing is employed. This is the most demanding of the housings to make, as accuracy is critical to its strength.
c) Follow these steps to make a stopped housing joint. Before you begin, make sure that your cutter and shelf thickness match. The easiest way to do this is to make a trial cut in a piece of scrap wood, then to thickness your shelf until it is a snug fit. Alternatively, you may have to make several passes with your cutter to achieve the desired width.
d) Take a try square and mark out the position of the housing on one side of your workpiece
e) Mark the end of the joint. It should be set about 8 to 12mm in from the front edge of the wood
f) Make sure the marked lines are clear; if necessary, go over them with a marking knife
g) Clamp a batten across the workpiece to guide the router, and use your try square to set it at 90° to the edge
h) Set the depth of cut and make several shallow passes. The depth should be no more than a third of the wood thickness.
i) The routed housing. Be careful not to overshoot the end mark
j) Square off the round end of the housing with a sharp chisel
k) The completed housing, ready to accept the end of a shelf
l) Hold the shelf member beside the housing and mark off the width of the notch to be removed
m) Hold it against the end of the housing and mark off the depth of the notch. Check that the marks line up
n) Cut away the notch with a bandsaw or a tenon saw. Apply glue and assemble the joint
o) From one side of the joint, the open end of the housing is clearly visible
p) From the other side, the joint is completely and neatly concealed
q) The tools you will need to cut a stopped housing joint include:
■ straightedge
■ pencil
■ try square
■ chisels
■ mallet
■ router
■ straight cutter
■ bandsaw or tenon saw
■ abrasive paper
■ straightedge
■ pencil
■ try square
■ chisels
■ mallet
■ router
■ straight cutter
■ bandsaw or tenon saw
■ abrasive paper
Activities 14:
a) Read the text above and then answer these questions below. Write your answers on a sheet of paper, don’t forget to write your name on the sheet.
Bring your paper in the next face to face session for correction.
1). Draw two joints from above on a seperate sheet of paper, and make notes. 2.) Which is the weakest joint? 3.) Which is the strongest joint? 4.) What is a mitre saw? 5.) What two tools are used to make a mortise and tenon joint?
1). Draw two joints from above on a seperate sheet of paper, and make notes. 2.) Which is the weakest joint? 3.) Which is the strongest joint? 4.) What is a mitre saw? 5.) What two tools are used to make a mortise and tenon joint?
No comments:
Post a Comment